
The Teaching Board is a slide editor for a Chinese lesson. You build a deck, drag real dictionary entries, HSK lessons, grammar points and readings onto the slides from the platform’s own library, and then present it — full screen for a screen-share, or straight onto your learners’ own screens. Open it and it works immediately: no account, no empty canvas, a demo lesson already on it.
Without a plan: The board, a worked example deck, printing, and eight widgets with no account at all
Creating a board spends 50 AI credits; a picture of your own spends 2; a Data poster spends 50.
What it is, and what it is not
It is a deck of slides, not an endless canvas. That is the one design decision everything else follows from: a lesson has an order, and a board you scroll around while a class waits does not have one.
It is also not a video call. There is no camera, no microphone, no recording and no screen streaming anywhere in it. You keep running the lesson on whatever you already use — Zoom, Meet, WeChat, italki’s own classroom — and the board sits beside it. What the board replaces is the generic whiteboard you were sharing: the one that knows nothing about Chinese.
- It knows the corpus — The left column searches 21,000+ dictionary entries, every HSK lesson, every grammar point, the readings, the listening exercises, the culture articles and the specialised modules. Drag one onto a slide and it is on the slide.
- It knows Chinese — Stroke-order animation, tone cards, a 田字格 writing grid, a pinyin table, the radical table, character formation — these are widgets, not pictures you had to make.
- A card points, it does not copy — A lesson on a slide is a reference to that lesson. It stays correct when the lesson is edited, it opens according to what each viewer is entitled to, and homework set from it marks against the learner’s real progress.
- It is private — Boards are not listed, not in the sitemap, and carry
noindex. Nobody sees one unless you hand them a link or present it to a circle.
Open it, and what you are looking at
The board opens with a two-slide demo deck — *HSK 1 Character Builder — 妈, 马, 吗* — so the first thing you see is a lesson rather than a blank page. Delete it whenever you like; it is only there so you can press things.
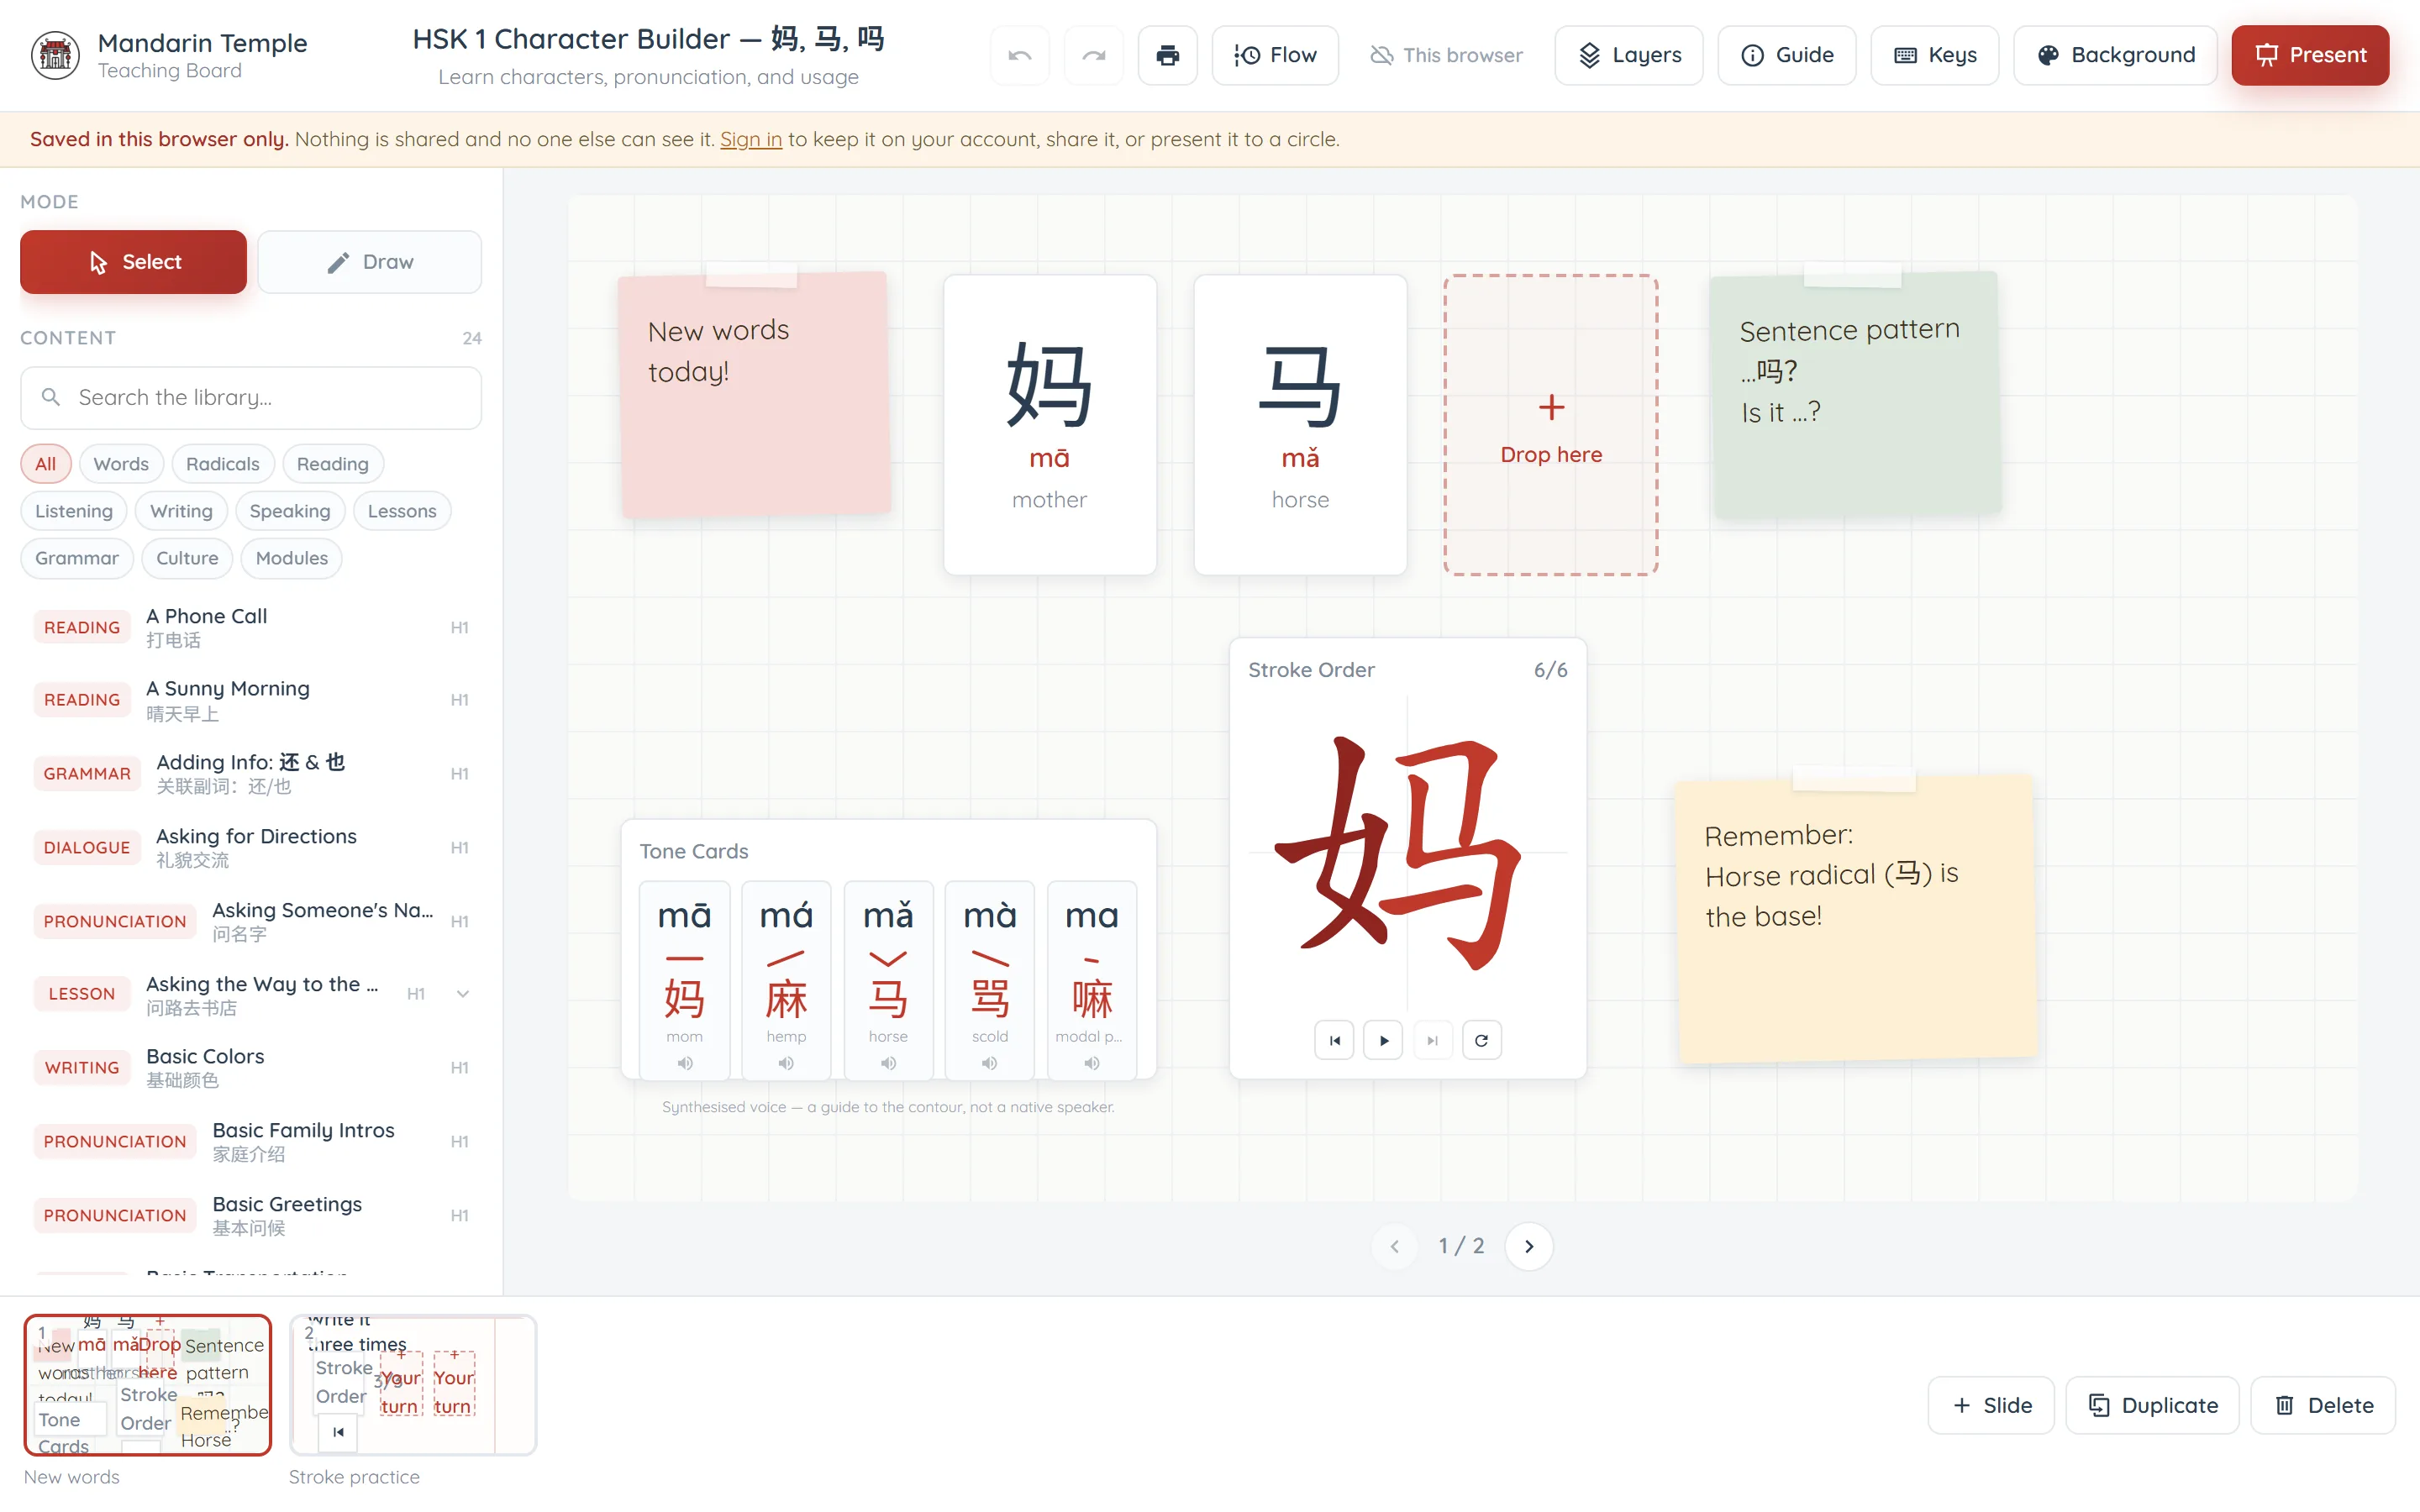
- Open the board — Go to the board. It loads without signing in and without fetching anything, which is also why it still opens when the rest of the site is having a bad day.
- Take the tour — Press Guide in the toolbar. Eight steps walk you round the screen — the title, the library column, templates, the slide, the filmstrip, the toolbar cluster, Present, and where your work is being saved.
- Name the lesson — Click the big title (it reads *Untitled lesson*) and type over it, then the line under it (*Lesson goal…*). Both save as you type. The goal is what a class sees when you present.
- Fill the first slide — An empty slide tells you the three ways in: search the library on the left, start from a template, or add a tool from the widget list. Click any of them to add it, or drag it onto the slide to place it exactly.
- Or skip all that and start from a lesson — Signed in, press Boards → New board and you are offered six ready-made lessons as well as a blank one — a first lesson, a vocabulary set, a grammar point, a handwriting workshop, a pronunciation clinic and a review. Each arrives as a finished deck with its timings already set. What is in them.
- Tidy up — Drag cards around and resize them from the corners, or press Grid, Row or Column under *Arrange* to lay out everything on the slide at once. That counts as a single undo.
- Add the next slide — Press Slide in the footer for a new one, or Duplicate to copy the one you are on. Type under a thumbnail to name it.
- Present it — Press Present for full screen — arrow keys, Space or PageDown to move, Escape to come back. That is the one to share in a call.
The five parts of the screen
- The header — The lesson title and goal, then the controls: Undo, Redo, Print, Flow, Present to, Share, Boards, Layers, Assign, Guide, Keys, Background, and the red Present button. Several only appear once you are signed in.
- The left rail — Four blocks stacked: Mode (Select or Draw), Content — the library search — Templates, and Widgets. Click a card on the slide and the whole rail turns into that card’s settings until you press Escape.
- The slide — The stage in the middle, always 16:9, with a pager underneath. What you see is exactly what a class sees.
- The filmstrip — Every slide along the bottom, with Slide, Duplicate and Delete. Click a thumbnail to go there.
- Layers — Press Layers (or Ctrl+I) for a tree of everything on the slide, front at the top. Drag to restack, click the eye to hide something while presenting, F2 to rename.
What you get, and what signing in adds
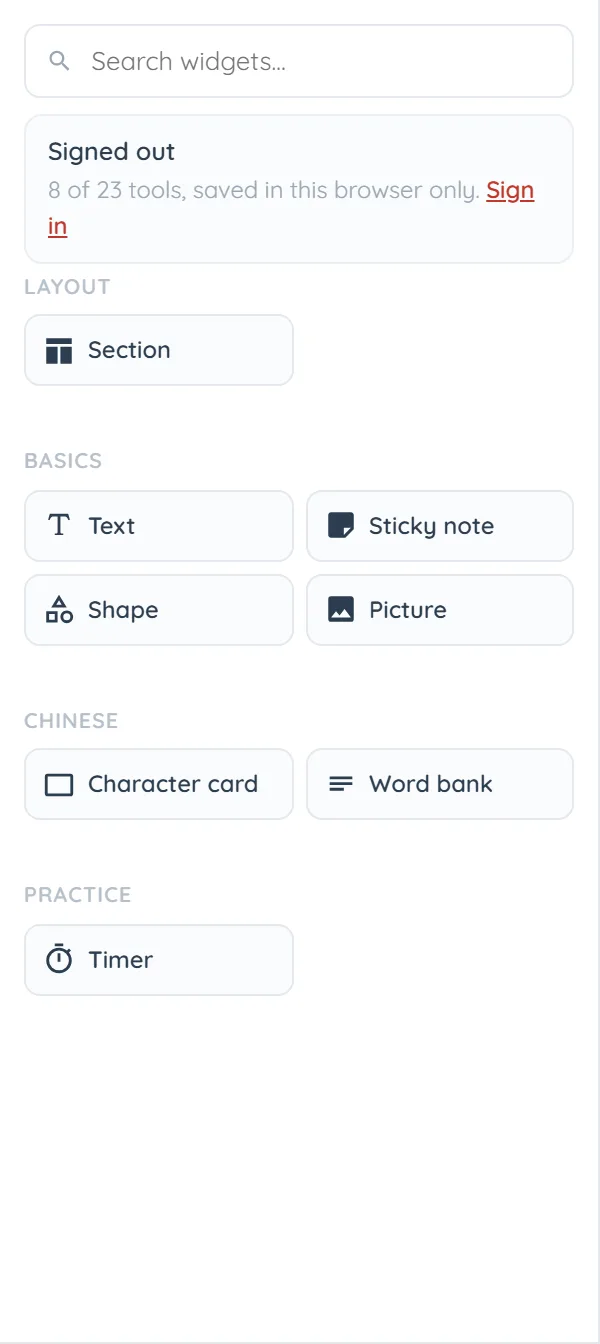
The widget library holds 24 tools, and how many of them you can place depends on who you are. Rather than padlocking the ones you cannot have, the board simply shows you fewer — and then tells you, in one line under the widget search, exactly what you are looking at.
- Signed out — 8 of 23 — Section, Text, Sticky note, Shape, Picture, Character card, Word bank and Timer. The library column works in full, so you can still build a slide out of real lessons and readings. Your deck lives in this browser and nowhere else.
- Any account — 20 of 23 — Everything above plus the Chinese and practice tools: stroke order, tone cards, the writing grid, the radical and pinyin tables, character formation, numbers, Fill the blanks, Match, Build a sentence, Write it, Say it and the Drop zone. Your boards move to your account and follow you to another device.
- A teaching seat — all 23 — Adds Random picker, Scoreboard and Quick check — the three that only make sense with a class in front of you — plus the Dialogue strip from the library column.
Presenting to a circle is a separate question again, and worth separating because it is easy to buy the wrong thing: it depends on owning a circle, not on the seat. Any signed-in account that teaches a circle can put a board in front of it. See Presenting to a circle.
Where your work is kept
There is no Save button anywhere on the board, because everything saves itself. What varies is *where*, and the board states it plainly in a line under the header and in a small status chip beside the toolbar.
- Signed out — “Saved in this browser only.” — One deck, stored in this browser. Clearing site data loses it, and it does not exist on another device. Nothing is shared and nobody else can see it.
- Signed in — “Saved to your account” — Your boards are on the account and follow you anywhere. The chip reads *Saving…* and then *Saved*. You may hold up to 200 boards.
- “Offline” — The save did not reach us. Keep working — it retries — but do not close the tab on a slide you cannot afford to lose.
- “Conflict”, and a Reload button — The same board was changed somewhere else — another tab, another device. Autosave stops rather than picking a winner. Pressing Reload puts a copy of what is on your screen onto your clipboard first, then loads the other version.
What it costs
The board itself costs nothing to open and nothing to use. Three things spend AI credits, and the board does not mention any of them on screen, which is why they are written down here:
Creating a board — 50. Adding a picture of your own — 2, which pays for the screening it goes through. Building a Data poster — 50, because the figures behind it are generated.
Everything else — every slide, every other widget, every card from the library, printing, presenting — is free once the board exists.
Credits are the platform-wide currency; see AI credits explained for where they come from. Sharing a board by link is the one feature that needs a paid plan rather than credits, and Sharing, printing and homework says exactly which.
Where to go next
Common questions
No. It opens for anyone, with 8 of the 24 tools and the whole content library, and your deck is saved in your browser. An account takes you to 21, keeps your boards on your account across devices, and unlocks sharing and presenting.